
Apr 02, 2026
Google released Gemma 4 on April 2, 2026. This guide walks you through the complete setup — autocomplete suggestions appearing inline in your Java editor.
1. Why Gemma 4 for local development?
Gemma 4 is Google DeepMind's latest family of open models, designed as highly capable reasoners with configurable thinking modes, native function-calling support, and notable improvements in coding benchmarks. It ships under an Apache 2.0 license — meaning you can run it commercially with no usage fees and no code leaving your machine.
For Java developers on IntelliJ, the value proposition is simple: GitHub Copilot sends your code to Microsoft's servers. Gemma 4 running on your own hardware does not. And you don't need to have a GitHub Copilot subscription.
2. Hardware requirements — pick your model variant
I have a medium hardware on windows machine:
- 16GB RAM
- RTX 3060 - 12GB VRAM
So I will use google/gemma-4-e4b, this model requires only 6GB RAM or VRAM. You can get the model from https://deepmind.google/models/gemma/gemma-4/ or from LMStudio: https://lmstudio.ai/models/gemma-4
When a more complex task is executed GPU is involved, and the consumed resources are as follows:

3. Install LMStudio
To make it simple, let's use https://lmstudio.ai/.
- Download and install it on your machine.
- From https://lmstudio.ai/models/gemma-4, click the get button for google/gemma-4-e4b
- Go to the developer tab in LMStudio and start it with the model
You should have something like this:

3.1. Install the Continue plugin in IntelliJ IDEA
Continue is the open-source plugin that bridges your IDE to LMStudio. It supports code completion, converting comments into code, and debugging assistance — and works entirely locally without sending your code to external servers and is free.
Install via the IntelliJ plugin marketplace:
- Open IntelliJ IDEA → File → Settings → Plugins
- Select the Marketplace tab and search for
Continue - Click Install, then restart IntelliJ when prompted
- The Continue panel appears in the right sidebar after restart
Alternatively, install from within the IDE using the keyboard shortcut Ctrl+Alt+S to open Settings, then navigate to Plugins.
4. Configure Continue for Gemma 4 chat + autocomplete
You can do it from IntelliJ IDEA continue plugin:
- Click the Continue plugin Icon
- In the continue Chat, click Add chat Model
- Choose LMStudio from the list and click Connect. A default configuration will be generated

- Go to Continue Settings, click Models, and click the settings of the model
- Update the code with:
name: Local Config
version: 1.0.0
schema: v1
models:
  - name: google/gemma-4-e4b
    provider: lmstudio
    model: google/gemma-4-e4b
    apiBase: http://localhost:1234/v1/
    roles:
      - autocomplete
      - chat
      - edit
      - apply
    defaultCompletionOptions:
      temperature: 0.2
      contextLength: 32768
    autocompleteOptions:
      debounceDelay: 100
      maxPromptTokens: 2024
      multilineCompletions: auto
Or update the Continue configuration from a config.yaml file located at C:\Users\<your-name>\.continue\config.yaml on Windows.
Open this file in any text editor and replace its contents with the following configuration. It sets up two separate model roles: Gemma 4 for chat/editing tasks and autocomplete.
name: Local Config
version: 1.0.0
schema: v1
models:
  - name: google/gemma-4-e4b
    provider: lmstudio
    model: google/gemma-4-e4b
    apiBase: http://localhost:1234/v1/
    roles:
      - autocomplete
      - chat
      - edit
      - apply
    defaultCompletionOptions:
      temperature: 0.2
      contextLength: 32768
    autocompleteOptions:
      debounceDelay: 100
      maxPromptTokens: 2024
      multilineCompletions: auto
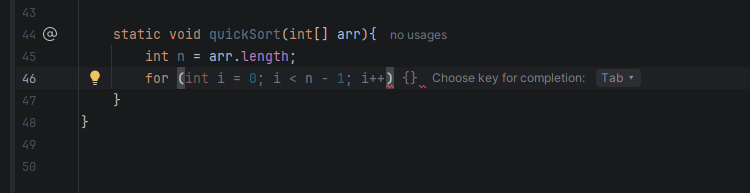
5. Enable and test TAB autocomplete in IntelliJ
Enable the setting
In IntelliJ, navigate to File → Settings → Tools → Continue and check the box for Enable Tab Autocomplete.
Test it in a Java file
